ftp://ftp.qtsoftware.com/qtcreator/snapshots/2009-10-27/qt-creator-win-opensource-1.2.93-200910270102-setup.exe
Tuesday, October 27, 2009
Breakpoint Issue Fixed!
The breakpoint bug has been fixed in the October 27th nightly Windows build.
Sunday, October 25, 2009
Breakpoint Update
Further to my breakpoint issues, the latest snapshot is a little better - breakpoints don't work the second time you run your application, but they do the third time ... but not the fourth ... fifth is a charm though! You get the idea. :) So, the Trolls are getting there.
Unused Variables
Qt Creator will display unused variables in grey, which I absolutely love. For example:

Once the variable is referenced in the method, the colour will change:

It's little touches like this that make this product a joy to use.
Monday, October 19, 2009
Breakpoint Woes
I am having some serious breakpoint woes with Qt Creator 1.2.92 at the moment. Breakpoints work fine the first time I set them, but once the application has been terminated, attempting to add/remove breakpoints will fail and they are never triggered. This is driving me nuts and only a restart of Qt Creator seems to fix it.


Reproducing this problem is easy.
- Fire up Qt Creator and create a new Qt4 Console Application project.
- In main() set a breakpoint on the first line of code.
- Hit F5 to debug. The breakpoint is triggered.
- Quit the application, then set a new breakpoint, or remove the existing one and set it again.
- Hit F5 to debug. The breakpoint won't be triggered.
It looks like the second time gdb is started you can only set breakpoints once the application is being debugged. This is all well and good for a GUI app where you may have the opportunity to toggle the breakpoint as your app is running, but for applications such as unit test projects, you don't have time to do this before the application quits!
I find it hard to believe that something so fundamental is broken so if anyone has any hints, I'll be grateful. FWIW I am using the version of gdb that ships with Qt Creator 1.2.92. I have tried pointing this to the 2009.03 version instead, but it makes no difference at all.
Now, what I think is happening is this... when Qt Creator starts a debug session it should apply any breakpoints you've set by registering them with gdb. This explains why, until you debug your app, the breakpoint symbol in your code has a little wait cursor next to it:
When you debug your app the first time this icon changes as Qt Creator successfully applies the breakpoint:
Any new breakpoints you add stay displayed with the wait cursor so it looks like Qt Creator isn't applying them.
Stepping Through Build Errors/Search Results
Built your project and now you need to step through the build errors? Or done a 'Find in Files' and you don't want to use the mouse to cycle through the results? On Windows, hit F6 to display the next error/result or Shift+F6 to display the previous.
Friday, October 16, 2009
Blogger Source Code Formatting
OK, this is nothing to do with Qt Creator but I wanted to share this site that formats source code ready for using in Blogger posts:
The results are pretty sweet:
 #include <QtGui/QApplication>
 #include "mainwindow.h"

 int main(int argc, char *argv[])
 {
   QApplication a(argc, argv);
   MainWindow w;
   w.show();
   return a.exec();
 }
XP-style Common Dialogs
If you are using Qt to create Windows apps for XP then you might of noticed that the standard file dialogs (e.g. QFileDialog::getOpenFileName) are still using 'classic mode':
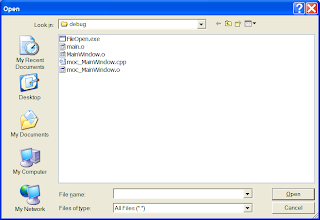
If you want XP mode versions then you'll have to add a resource file that contains a reference to a magic manifest file which specifies that your app using v6 of the MS common controls library. This is a similar process to adding an application icon as described in my previous post.
First create a file with a .manifest extension (e.g. MyApp.manifest) containing the following XML:
<?xml version='1.0' encoding='UTF-8' standalone='yes'?>
<assembly xmlns='urn:schemas-microsoft-com:asm.v1' manifestVersion='1.0'>
<dependency>
<dependentAssembly>
<assemblyIdentity type='win32' name='Microsoft.Windows.Common-Controls' version='6.0.0.0' publicKeyToken='6595b64144ccf1df' language='*' processorArchitecture='*' />
</dependentAssembly>
</dependency>
</assembly>
Then create (or edit) your applications resource file (e.g. MyApp.rc) and add the following line:
1 24 DISCARDABLE "MyApp.manifest"
If you haven't done already, add a win32 specific entry to your .pro file that points to your .rc file:
win32:RC_FILE = MyApp.rc
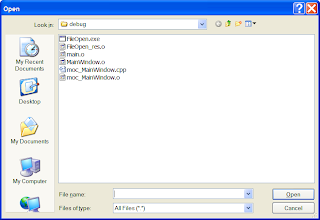
Build your project and you'll now have shiny XP common file dialogs:
Application Icon on Windows
So you've written a cool Windows app using Qt - but hey, it doesn't have an icon! Well, adding one is quite easy.
Simply create a special resource file that contains a reference to the .ico file that you want to use and then add a RC_FILE entry to your .pro file. The resource file usually has a .rc extension, and will look something like this (e.g. MyApp.rc):
IDI_ICON1 ICON DISCARDABLE "path/to/an/icon.ico"
The .pro entry that points to this file should be win32 specific:
win32:RC_FILE = MyApp.rc
Rebuild and hey presto! a nice Windows icon for your app.
You can also give your Linux/Mac applications an icon. More info on this can be found here:
Wednesday, October 14, 2009
Tuesday, October 13, 2009
Shipping Qt DLLs
If you're using Windows and you want to ship a Qt application then, unless you're statically linking, you'll need to ship some Qt DLL files. Be warned - there are two sets of these files installed with the Qt Creator SDK and only the ones found in the qt\bin folder will work. This set of DLLs have been built using the MinGW compiler, which is the one used by default when you build a project using Qt Creator. However, the set found in the bin folder (and Qt Creator itself) are built using MSVC and are essentially private to Qt Creator - shipping these instead will result in DLL Entry Point Not Found errors when you launch your application.
Now, this begs the question - why is Qt Creator built using MSVC? Isn't MinGW up to the task? Good question. The version of MinGW that ships with the Qt 4.5 SDK is quite an old release and the MSVC compiler generates much smaller files (and arguably generates better code.) I guess the Nokia team wanted to ensure that their flagship tools use the best compiler for each platform.
Whether the forthcoming MinGW update due to be shipped with Qt 4.6 later this year does a much better job or not remains to be seen. It will be interesting to see which compiler they decide to built their toolset with...
Monday, October 12, 2009
Generating Automatic Version Numbers
All of my projects use a special version numbering scheme - major.minor.revision.build - revision is the Subversion revision and build is a build number based on the current date. Whenever I build a project I want this version number to be updated automatically (if it has changed), but making this work using QMake isn't obvious ... but once you know how, it could be used for a variety of different uses.
I have a special Qt-based EXE project that generates the version number by creating a version.h file that looks something like this:
#ifndef VERSION_H
#define VERSION_H
namespace Version
{
static const int MAJOR = 1;
static const int MINOR = 2;
static const int REVISION = 2572;
static const int BUILD = 15280;
}
#endif // VERSION_H
I then #include this header where necessary. The EXE is passed the major/minor version number and the name of the output file (e.g. version.h) and it extracts the SVN revision and generates the special build number. I'll spare you the code - all you need to know is how to ensure this EXE is launched each time I build a project that requires it.
First, I use a subdirs project that contains the version-generator .pro file, ensuring I have a version.exe file to execute. Then, in my main apps .pro file I have something like this:
MAJOR = 1
MINOR = 2
VERSION_HEADER = ../version.h
versiontarget.target = $$VERSION_HEADER
versiontarget.commands = ../version/debug/version.exe $$MAJOR $$MINOR $$VERSION_HEADER
versiontarget.depends = FORCE
PRE_TARGETDEPS += $$VERSION_HEADER
QMAKE_EXTRA_TARGETS += versiontarget
The MAJOR and MINOR definitions are changed by hand when required, the rest is automatic. The key part here is the FORCE keyword - this is poorly (if at all?) documented and ensures that the QMAKE_EXTRA_TARGETS command works every time. Extending this scheme to run additional targets would be simple - create another 'target' type and add it to the list (for example, you may want to launch a shell script that generates some code, etc.)
Getting this to work involved a lot of StackOverflow/Qt-list posts - I hope you find it useful.
Automatically Running Unit Tests
QMake supports a useful post link step via the QMAKE_POST_LINK keyword that allows you to execute a command once your project has been built. One handy use for this is to execute unit tests - simply add something similar to your .pro file:
CONFIG(debug, debug|release) {
QMAKE_POST_LINK = ./debug/$${TARGET}.exe
}
else {
QMAKE_POST_LINK = ./release/$${TARGET}.exe
}
When linking is complete the appropriate EXE will be launched, and your tests will run (note that the above would need to be changed for Unix/Mac builds as the .exe file won't exist - I'll leave this as a lesson for the user.)
You can use this in conjunction with a subdirs project to ensure that your tests are executed whenever any of the code they reference changes.
Tuesday, October 6, 2009
Qt Creator 1.2.91
The latest snapshot of v1.2.91 will group your project source files into Forms, Headers, Resources and Sources which is very useful indeed. Get it here:

ftp://ftp.qtsoftware.com/qtcreator/snapshots/
Monday, October 5, 2009
Running Multiple Unit Tests
Qt Creator supports creating a unit test project but the Qt documentation only describes running a single test. To run multiple tests you need to modify your main function to create an instance of each test object and then call qExec on it. Easy enough, but when you start creating lots of tests it's easy to forget to add the necessary code. I decided to simplify this process and came up with a small header file that you can use to make running multiple tests a breeze.
The code for the header, AutoTest.h can be found below. To use it, simply:
- Add a #include "AutoTest.h" to all your QObject-derived test headers.
- Add DECLARE_TEST(YourTestClassName) below your class definition.
- Change your main.cpp to look like this:
#include "AutoTest.h"
TEST_MAIN
Easy. If you still need to supply your own main function (you might have other initialization code in here) then you can run all the tests with the following line of code:
AutoTest::run(argv, argc);
This function will return 0 if all the tests passed.
The source for AutoTest.h:
#ifndef AUTOTEST_H
#define AUTOTEST_H
#include <QTest>
#include <QList>
#include <QString>
#include <QSharedPointer>
namespace AutoTest
{
typedef QList<QObject*> TestList;
inline TestList& testList()
{
static TestList list;
return list;
}
inline bool findObject(QObject* object)
{
TestList& list = testList();
if (list.contains(object))
{
return true;
}
foreach (QObject* test, list)
{
if (test->objectName() == object->objectName())
{
return true;
}
}
return false;
}
inline void addTest(QObject* object)
{
TestList& list = testList();
if (!findObject(object))
{
list.append(object);
}
}
inline int run(int argc, char *argv[])
{
int ret = 0;
foreach (QObject* test, testList())
{
ret += QTest::qExec(test, argc, argv);
}
return ret;
}
}
template <class T>
class Test
{
public:
QSharedPointer<T> child;
Test(const QString& name) : child(new T)
{
child->setObjectName(name);
AutoTest::addTest(child.data());
}
};
#define DECLARE_TEST(className) static Test<className> t(#className);
#define TEST_MAIN \
int main(int argc, char *argv[]) \
{ \
return AutoTest::run(argc, argv); \
}
#endif // AUTOTEST_H
A typical test class header would look something like this:
#ifndef FOOTESTS_H
#define FOOTESTS_H
#include "AutoTest.h"
class FooTests : public QObject
{
Q_OBJECT
private slots:
void initTestCase();
void test1();
void test2();
void cleanupTestCase();
};
DECLARE_TEST(FooTests)
#endif // FOOTESTS_H
Apologies for the formatting - haven't worked out how to post decent looking code using blogger yet.
Ctrl+Click
How did I miss this? Hold down the Ctrl key and when you hover over a symbol with the mouse, it changes to a hyperlink - click it to go to the symbol definition. Brilliant!
Qt Creator 1.2.90
There is a Qt Creator Technology Snapshot available - version 1.2.90. It's well worth upgrading. Goodies include #include completion and local symbol rename feature. You can also supply a template to use when creating new .cpp/.h files - the contents of the specified template file are inserted at the top of the file. I have a very simple one that adds the Subversion $Id$ tag. Very handy.
Project Not Linked When Dependent Library Changes - Update
PRE_TARGETDEPS fixes this linking issue. You need to add something similar to the following to your .pro file that uses a static library:
PRE_TARGETDEPS += ../path/to/your/lib.a
This will ensure that if your lib changes (but not the project using it), everything will be correctly relinked.
Bit of a hack, but this is not unusual with qmake. :)
Subscribe to:
Posts (Atom)